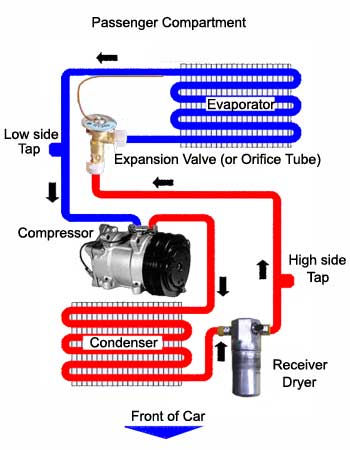
knowledge
simply reducing the pressure of the liquid
refrigerant will cause the temperature to be reduced. The expansion valve (or orifice tube) does just that.
diagnosis
空调完全不制冷, 可能为Compressor或Compressor上的clutch损坏. 需更换compressor or clutch制冷不畅.
可能为空调漏氟,需更换全部的橡胶密封圈(O RING), expansion device,the fitments for the
oil cooler and transmission cooler for the radiator. ACCUMULATOR (DRYER) 和O TUBE (我的车车的O TUBE必须连着高压管一起换)
if your evaporator inlet and outlet feel
the same temperature to your touch, and you still have a “no cooling”
condition, then you have another problem in the controls, temperature blend
door or air distribution. But you know your A/C refrigerant circuit is working
perfectly. Remember that in order to check a superheat condition in the
evaporator, you are checking the DIFFERENCE between the temperature at the
inlet and outlet. Be sure that you locate the orifice tube (where the dimples
on the tube are) and you check the temperature AFTER that point.
by looking at the inlet side of the orifice
tube screen. If a substantial amount of debris is found, flushing would be
recommended.
buy
Compressor;
-----tool-----
1.
专业级空调真空/压力表 (对解决疑难问题非常有用)
2.
wiggle socket
3. A/C and fuel line separator
4. 绿色垫圈
2. 旧真空泵Vacuum Pump ($30)
(注:专用空调真空泵需$300.) 去修车铺抽真空,耗费$20.
air compressor, how many gallons?
PAG oil (100 viscosity) . Ester 润滑油,$7.
O-ring, 买了两次才够, 每次$4.99. 第一次买的缺少某些size.
第二次买的正好补上缺的. Nylog, 准备装O-ring的时候滴一滴来防漏的, 结果没买到. 就算了
Pulley?
Snap-On swivel socket
Air
Conditioning System Flush Kit
spanner wrench
-----step-----
空调里面怕水汽. 找个干燥的晴天做吧. 或者做完了用干燥空气或氮气再清一道.
抽真空
看看各个接头的地方, 有没有油出来后灰尘沾染后结的黑垢也就差不多了.
Receiver driers are almost always on the
HIGH pressure side, usually in the liquid line that runs between the condenser
and evaporator.
there are two sizes of AC fittings on the
car. A big one (HP side) located up by the rad and a small one (LP side) down
below the PS tank.
remove the radiator fan
Compressor is much easier to get to after
you pull the dryer.
Getting the lines off the dryer is very
diffucult and requires en expensive release tools.
it would have been a whole lot easier to
take it out from the top. Because of the 'locking' holes at the radiator and
the PS pump hoses and all. The radiator itself, however, is easier to take out
from the bottom.
I added an
ounce or so of PAG oil (100 viscosity) to the suction port of the replacement
compresso
The rear bolts are a cinch after
disconnecting the lines, the front bolts are a bit of a challenge to get to.
The upper one requires a socket/ratchet combination of just the right width,
given the proximity of the framerail and other pulleys. The lower one can be
accessed through the wheel well with a Snap-On swivel socket and an extension.
Once all four bolts are out, the compressor can be removed from the top.
灌入清洗油,然后用高压空气将油从另一端打出,
用漏斗将少量A/C flush oil由condenser的入口倒入, 等待3分钟后, 用汽车胎打气机的压缩气出口接在condensor的入口上打气,你将看到一股股的黑色脏油喷出. 然后再灌入少量A/C flush oil,再打出,直到喷出的油干净为止. 继续打气,直到没有油喷出为止.
其他如high press pipe, low press pipe and evaporator的清洗与以上相同. 清洗完毕,还需要更换ORIFICE
TUBE, $5但对于有些汽车的O TUBE 与High Press Line是一体化的,就只能更换新的high press line了.$30.
安装时,建议把每个部件与其他部件相连处的绿色垫圈全部更换,以防止日后漏氟. 垫圈在AUTOZONE可以买到, $5 一大包.
You can pour refrigerant oil into the
suction port and turn the compressor hub by hand which will pump clean oil
through the compressor. Remember, compressors don't compress liquids. So, make
sure you rotate the compressor hub by hand enough to ensure you don't liquid
"slug" the compressor. hoses with mufflers should be replaced instead
of flushed.
Flush evaperator和联接的管道, 3是condensor和连接的管道. 加入清洗油, 然后用propane从一边管道冲, 另一边管道就冲出气态propane和油. 用塑料桶接着. 冲洗几遍后, 加Ester润滑油再冲两遍. 压缩机的清洗, 是倒出旧油, 然后加入清洗油, 上下左右颠倒, 再旋转,然后倒出. 如此几遍, 换成Ester再来几遍. 我想是否不买清洗油, 直接用Ester大概也可以. 不过Ester比清洗油粘稠.
3. 拆开所有的接头, 换上新的O-ring. 有一个结果我拧不开, 就没换. 还有一个接
头, 邻居说, 既然没漏, 为何要换. 结果就没换.
4. 都拧紧, 换上买来的要换的receiver
dryer和新的一段管道, 就这样了.
5. (还没做) 检漏. 需要给系统加上压力, 然后看是否漏. 还没想好怎么做. 我准备
直接加一灌R134进去然后看漏不漏. 有条件的加氮气. 没条件的加压缩空气. 我
更没条件. 连气压计都没有.
6. (还没做) 再次抽真空.
7. (还没做) 加润滑油和R134.
Changing an Evaporator Core - in Pictures Link to
http://www.kodakgallery.com/ShareLanding.action?c=10f8s0wj.8zl8j8h7&x=0&y=o2vyri&localeid=en_US
pull a vacuum to make sure the system is
still sealed
I use 4 ounces (120 ml) if I find oil I can
pour out of old accumulator. If the evaporator lost enough oil out of system so
the accumulator is dry then add 6 ounces (190 ml).
SInce you are working on it during cold
weather you need to run engine for 20 minutes and have heater turned on full
inside car as you pull vacuum on system. The moisture in system will not be
removed when the temp of system components is below 25C. The water will not
evaporate during the evacuation below that temp but warming the components
allows it to happen. Leaving moisture in system will kill the new evaporator in
2-3 years due to internal acid corrosion.
(civic)
for condenser replacement add 50ml(1 2/3oz)
for receiver/dryer add 10ml(1/3oz)
(Mustang)A full oil charge is 7 ounces for
that system. I normally run 8 ounces, as Ford tends to underlubricate. The
accumulator is huge on these systems, and the extra ounce is just insurance,
really. I put 4 in the compressor and 4 in the accumulator. The green dye is
the oil in that system. The new PAG oil you get won't have that in it, so for
leak detection purposes, it may be a good idea to add some u/v dye in with the
new PAG oil. I will assume the old comp failed, since the comp, accum, and
liquid line are the correct parts to be replacing for a comp failure. Just be
darn sure to flush the evap, cond, and manifold lines to get rid of any
contaminants left from the old comp, and evacuate the system for 30 min to pull
any moisture out before charging. This way you know you have a clean, dry
system, and are also sure how much oil to add. Which would be a full charge, in
this case.


No comments:
Post a Comment