Wednesday, May 9, 2012

ac system air conditioning


knowledge
simply reducing the pressure of the liquid 
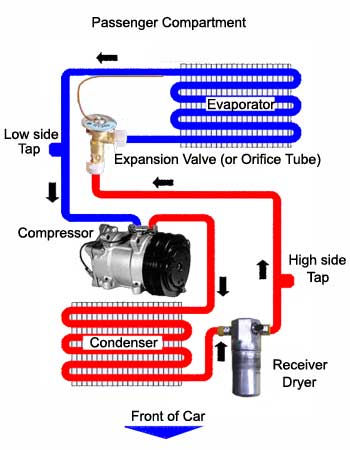
refrigerant will cause the temperature to be reduced. The expansion valve (or orifice tube) does just that.
diagnosis
空调完全不制冷, 可能为CompressorCompressor上的clutch损坏. 需更换compressor or clutch制冷不畅.
可能为空调漏氟,需更换全部的橡胶密封圈(O RING), expansion devicethe fitments for the oil cooler and transmission cooler for the radiator. ACCUMULATOR (DRYER) O TUBE (我的车车的O TUBE必须连着高压管一起换)
if your evaporator inlet and outlet feel the same temperature to your touch, and you still have a “no cooling” condition, then you have another problem in the controls, temperature blend door or air distribution. But you know your A/C refrigerant circuit is working perfectly. Remember that in order to check a superheat condition in the evaporator, you are checking the DIFFERENCE between the temperature at the inlet and outlet. Be sure that you locate the orifice tube (where the dimples on the tube are) and you check the temperature AFTER that point.
by looking at the inlet side of the orifice tube screen. If a substantial amount of debris is found, flushing would be recommended.
buy
Compressor;
-----tool-----
1.      专业级空调真空/压力表 (对解决疑难问题非常有用)
2.      wiggle socket
3. A/C and fuel line separator
4. 绿色垫圈
2. 旧真空泵Vacuum Pump ($30) (:专用空调真空泵需$300.)  去修车铺抽真空,耗费$20.
air compressor, how many gallons?
PAG oil (100 viscosity) .  Ester 润滑油,$7.
O-ring, 买了两次才够, 每次$4.99. 第一次买的缺少某些size. 第二次买的正好补上缺的. Nylog, 准备装O-ring的时候滴一滴来防漏的, 结果没买到. 就算了
Pulley?
Snap-On swivel socket
Air Conditioning System Flush Kit
spanner wrench
-----step-----
空调里面怕水汽. 找个干燥的晴天做吧. 或者做完了用干燥空气或氮气再清一道.
抽真空
看看各个接头的地方, 有没有油出来后灰尘沾染后结的黑垢也就差不多了.
Receiver driers are almost always on the HIGH pressure side, usually in the liquid line that runs between the condenser and evaporator.
there are two sizes of AC fittings on the car. A big one (HP side) located up by the rad and a small one (LP side) down below the PS tank.
remove the radiator fan
Compressor is much easier to get to after you pull the dryer.
Getting the lines off the dryer is very diffucult and requires en expensive release tools.
it would have been a whole lot easier to take it out from the top. Because of the 'locking' holes at the radiator and the PS pump hoses and all. The radiator itself, however, is easier to take out from the bottom.
I added an ounce or so of PAG oil (100 viscosity) to the suction port of the replacement compresso
The rear bolts are a cinch after disconnecting the lines, the front bolts are a bit of a challenge to get to. The upper one requires a socket/ratchet combination of just the right width, given the proximity of the framerail and other pulleys. The lower one can be accessed through the wheel well with a Snap-On swivel socket and an extension. Once all four bolts are out, the compressor can be removed from the top.
灌入清洗油,然后用高压空气将油从另一端打出,
用漏斗将少量A/C flush oilcondenser的入口倒入, 等待3分钟后, 用汽车胎打气机的压缩气出口接在condensor的入口上打气,你将看到一股股的黑色脏油喷出. 然后再灌入少量A/C flush oil,再打出,直到喷出的油干净为止. 继续打气,直到没有油喷出为止.
其他如high press pipe, low press pipe and evaporator的清洗与以上相同. 清洗完毕,还需要更换ORIFICE TUBE, $5但对于有些汽车的O TUBE High Press Line是一体化的,就只能更换新的high press line.$30.
安装时,建议把每个部件与其他部件相连处的绿色垫圈全部更换,以防止日后漏氟. 垫圈在AUTOZONE可以买到, $5 一大包.
You can pour refrigerant oil into the suction port and turn the compressor hub by hand which will pump clean oil through the compressor. Remember, compressors don't compress liquids. So, make sure you rotate the compressor hub by hand enough to ensure you don't liquid "slug" the compressor. hoses with mufflers should be replaced instead of flushed.
Flush evaperator和联接的管道, 3condensor和连接的管道. 加入清洗油, 然后用propane从一边管道冲, 另一边管道就冲出气态propane和油. 用塑料桶接着. 冲洗几遍后, Ester润滑油再冲两遍. 压缩机的清洗, 是倒出旧油, 然后加入清洗油, 上下左右颠倒, 再旋转,然后倒出. 如此几遍, 换成Ester再来几遍. 我想是否不买清洗油, 直接用Ester大概也可以. 不过Ester比清洗油粘稠.
3. 拆开所有的接头, 换上新的O-ring. 有一个结果我拧不开, 就没换. 还有一个接
   , 邻居说, 既然没漏, 为何要换. 结果就没换.
4. 都拧紧, 换上买来的要换的receiver dryer和新的一段管道, 就这样了.
5. (还没做) 检漏. 需要给系统加上压力, 然后看是否漏. 还没想好怎么做. 我准备
   直接加一灌R134进去然后看漏不漏. 有条件的加氮气. 没条件的加压缩空气.
   更没条件. 连气压计都没有.
6. (还没做) 再次抽真空.
7. (还没做) 加润滑油和R134.

Changing an Evaporator Core - in Pictures Link to http://www.kodakgallery.com/ShareLanding.action?c=10f8s0wj.8zl8j8h7&x=0&y=o2vyri&localeid=en_US
pull a vacuum to make sure the system is still sealed

I use 4 ounces (120 ml) if I find oil I can pour out of old accumulator. If the evaporator lost enough oil out of system so the accumulator is dry then add 6 ounces (190 ml).
SInce you are working on it during cold weather you need to run engine for 20 minutes and have heater turned on full inside car as you pull vacuum on system. The moisture in system will not be removed when the temp of system components is below 25C. The water will not evaporate during the evacuation below that temp but warming the components allows it to happen. Leaving moisture in system will kill the new evaporator in 2-3 years due to internal acid corrosion.

(civic)
for condenser replacement add 50ml(1 2/3oz)
for receiver/dryer add 10ml(1/3oz)
(Mustang)A full oil charge is 7 ounces for that system. I normally run 8 ounces, as Ford tends to underlubricate. The accumulator is huge on these systems, and the extra ounce is just insurance, really. I put 4 in the compressor and 4 in the accumulator. The green dye is the oil in that system. The new PAG oil you get won't have that in it, so for leak detection purposes, it may be a good idea to add some u/v dye in with the new PAG oil. I will assume the old comp failed, since the comp, accum, and liquid line are the correct parts to be replacing for a comp failure. Just be darn sure to flush the evap, cond, and manifold lines to get rid of any contaminants left from the old comp, and evacuate the system for 30 min to pull any moisture out before charging. This way you know you have a clean, dry system, and are also sure how much oil to add. Which would be a full charge, in this case.


check maintenance


1. set of socket wrench/socket, set of craftman or other name brand.
2. automotive diagnositic multimeter
jack stands or ramps, floor jack, deep sockets, mallet 材料好,不容易变形;尺寸准确.

一套1/2 drive socket + breaker bar 比较bulky,可以拧东比较紧的螺丝。
一套3/8和1/4 drive的socket,对付车上的小螺丝。
Weekly checks
1. Engine oil check (DIY)
2. Coolant level  check (DIY)
3. Brake and Clutch fluid level check (DIY)
4. Screen Washer level check (DIY)
5. Power steering fluid level check (DIY)
6. Wiper blades check (DIY)
7. Tyre condition and pressure check (DIY)
8. Bulbs and fuses check (DIY)

Every 3000-5000miles or 3-5months
1. Renew the engine oil and filter (DIY)

Every 10,000miles
1. Check the brake pad thickness (DIY)
2. Renew the pollen filter elment (DIY)

Every 12 months
1. Check the operation of all lights and horn (DIY)
2. Check the automatic fluid level (DIY)
3. Check all the underbonnet components and hoses leakage (DIY)
4. Lubricate all hinges, locks and door check straps (DIY)
5. Check the condition of driveshaft gaiters
6. Check the braking system for leakage and damage (DIY)
7. Check the conditon of exhaust system and its mountings (DIY)

Every 20,000 miles
1. Check the condition of driving belts, renew if necessay (DIY)
2. Renew the spark plugs (DIY)
3. Renew the Air filter (DIY)
4. Check the manual transmission oil level (DIY)
5. Check the transmission leak or damage (DIY)

Every 40,000 miles
1. Renew the automatic trans fluid and filter
2. Renew the fuel filter (DIY)

Every 2 years
1. Renew the coolant (DIY)
2. Renew the brake fluid (DIY)
------

tools


general: 剪子,钳子,锤子(铁的和胶的),扳手,起子,刀子,...手套,安全goggle,面具:)
1. 支车:
        . 1 floor jack (preferable 20" above) 或者 车带jack(麻烦且工作受限)
        . 2 jack stands (preferable 2.5 ton above)
        . 2 wheel chokes (or bricks if you can find some good ones:P)
2. 装卸轮子:
        . 支车 或者 车带jack
        . 1/2 socket set w/ breaker bar
        . 1/2 torque wrench
        . preferable an impact wrench
        . Tire pressure gauge and pump if dealing with tire pressure:)
3. 换油: (写在or前面的是preferable的)
        . 支车工具
        . 1/2 or 3/8 torque wrench
        . 1/2 or 3/8 socket set w/ breaker bar
        . preferable a filter wrench (adjustable的那种爪式wrench一般只用来卸)
        . 3/8 socket set if you want to use cap-style filter wrench
        . A pan to hold old oil:)
        . A 漏斗 to add new oil:)
4. 换闸:
        . 支车 和 装卸轮子 工具
        . C Clamp(类似钳工夹固刚件的东西,不过是超简易缩小版本:P)
        . High Temperature Grease
        . flat screw driver (optional)
        . 2 screws (两个M8的螺丝?) to force drum out if drum brake gets stuck
        . a 3/8 torque wrench (optional, 可以用1/2的大家伙将就)
        . Brake cleaner (optional, to clean the brake powder ash safely)
5. spark plug: (写在or前面的是preferable的)
        . 3/8 or 1/2 torque wrench
        . 3/8 socket set w/ long extension bar
        . actually it's the 3/8 spark plug socket
        . a long nose, slim 钳子 (optional but helpful)
        . clearence gauge (optional)
        . anti-sieze (optional, may use frsh eng. oil on plug threads instead)
        . a rubber tube that fit on the plug' china stick (optional)
6. electrical (电池,发电机,starter,Keyless/Alarm...):
        . 1 multimeter w/ DCA DCV OM(w/ conductivity), preferable digital
        . some extension or replacing gauge electr. wires
        . knife and 剪刀
        . electr. soldering iron/gun w/ solder
        . electr. tape and optional mounting/organizer kits
        . other misc.
7. Body Painting:
        . Touch-up w/ clear coat
        . fine grain sand paper (newer car 1500-2000 grain, trash car 1000 ok)
        . polishing compound & Wax
        . 100% cotton towel
        . Sanding machine if you have a heavy duty trash car w/ large damage:)
        . other misc.
8. 其他各种油和液体:
        . some wrench:)
        . if brake fluid, need 支车 和 装卸轮胎, and a 助手 或者 真空泵
        . if tranny fluid, need 支车 at least
        . matching fluid
        . various kinds of 漏斗 + 连接管子
        . A pan
        . other misc.
9. 发动机部分,传动/轮轴部分:
        . 支车 卸轮 的都备好吧
        . 大号的torque wrench may be needed (e.g. 250 ft*lb +)
        . some chalk or white paint to mark original positions:)
        . heavy duty pry bar
        . jumbo socket may be needed:)
        . preferable a pwrful impact wrench
        . n-jaw puller, if needed
        . all kinds of wrenches, socket, extensions
        . other misc
10. 油路部分:
        . various kinds of socket and wrench, including crawfoot wrench
        . safety shop towel:)
        . vacuum pump w/ gauge & fuel pressure gauge may needed if debugging:)
        . 支车 卸轮 if needed
        . other misc.
11. Mounting, Broken bolts rescue:
        . Electr. Drill
        . WD-40 or other liquid wrench or rust eater
        . screw extractor, tap & die set (主要需要公的攻丝锥:P), if needed
        . other misc.
13. Muffler:
        . powerful rust eater and/or liquid wrench
        . Various wrench and socket (important:P)
        . lubricant liquid like WD-40
        . 撬,钳,割,锯等各种下三滥工具
        . 当然要支车 (and 卸轮)

jack car


jack stands on the frame under driver side. -- the rail bend as I lower the jack
put floor jack to jack up the point just adjacent to the standard jack stand point and put jack stand in very solid.

: if want to use scissor jack, first look for additional jacking point in the middle of outside frame between the front and rear one.
: mine has it. So I jacked up there and put jack stand to the front or rear.
Put jack stand under the frame, anywhere.

radius arm; pinch weld; front axle; control arm, right on the cut out; pinch rail, sub frame; inner fram center jack point not trusted.
You will see at the screw jack, there is a slot. You must fit the slot under the jackpoint like the picture below.

再frame的靠近轮子的部分,用小槽或者其它方法标注。多半是owner's manual里面介绍的更换备用胎的时候支撑的地方。里面一点的rail上,就是地盘下面的两条明显的
钢梁。如果jack stand放在frame的支撑点上,一定要把那个点放在在jack stand的中心上,避免可能的侧偏,甚至把frame的支撑弄折。放在rail上,也是一样的道理。
只是rail比较宽,应该可以更容易判断中心。如果需要把frame上的支撑点给jack stand用的话,在什么地方可以放这个scissor jack呢?这个时候需要考虑购买floor jack了,floor jack的支撑点,多半在车的中心线上,前后各一个。具体位置,只能去service manual,或者repair manual上面找了。俺的小破车,前后都是一个铁钩子,还见过有的车是一块白色的塑料块,在底盘的中间位置,或者直接是中间的加固钢梁上面。也有人介绍说,可以用floor jack去支撑suspension上面的一些地方,但是俺具体没有用过。如果运气好,scissor jack也是可以撑这个floor jack的地方。俺的是不行了,因为是个钩子,平的地方应该就可以。但是需要深进去老远,另外,把jack stand放在里面的rail上面的方法也不用买floor jack。它和scissorjack匹配的很好,直接在frame上撑起来,然后把jack stand调整好高度,放进去即可。
沥青的也已接受,但一定要注意当时的温度,路面是否可以承受重力。俺今天就发现,家门口的一块地面非常的松软。尽量避免有斜坡的地方,选择放开刹车,车不会自己滑动的位置。当撑前面的时候,需要把后面的两个轮子block住,同时把手刹拉紧。撑后面的时候,就一定要上档。手动车用1st,自动车用P,而且需要block前轮。
过程中,一定要注意,jack是否在最佳的位置,是否偏离了中心,避免滑落。为了保持最佳的稳定,通常把jack stand放在最低点,而且两面的高度一定要保持一致. 放一点,看一下,因为车会随着放的过程有前后,甚至微小的左右移动,可能在车身接触jack stand之前,已经让jack stand错过了对应的那个支撑点了。如果发现放歪
了,不要着急,重新把jack升起来(控制hydralic floor jack的升降,还是需要一定的练习。可以不加负荷,多练两次,甚至不放jack stand,只是把车抬起放下几次,直到可以准确控制高度,熟练为止)完全把车放在了jack stand上以后,撤掉jack,需要最后确认一边车的平稳。前后左右轻轻的用力推动,看看是否有晃动,地面是否可靠。
0. 绝对避免在车流量比较大的地方撑车。一旦发生碰撞,根本没有办法控制,同时找到伙伴在周围。
1. 绝对不要在松软、不水平的地上撑车。
2. 绝对不要在没有block轮子的时候撑车。
4. 绝对不要再车地下用过多左右或者前后的力量,避免车从jack stand上翻下。可以用一定上下方向的力。

windshield wiper


The problem may be something simple like a disconnected hose, or dirt in the spray nozzle.

Difficulty: Moderate
Instructions
Things You'll Need:
Windshield-washer Fluid
Replacement Hose
Compressed Air And Air Nozzle
Funnel
Needle Or Pin
Step 1
Turn on the windshield washer with the engine off and the key in the On position.

Step 2
Listen for a humming sound to determine whether the windshield washer motor is operative. Open the hood and ask a friend to listen while you turn on the windshield washer. If you don't hear any sound, check the fuses.

Step 3
Replace the fuse if it is blown (see How to Fix a Faulty Car Fuse). If the fuse is not blown and the motor is silent, have your mechanic replace the windshield-washer motor. If you hear the motor humming, proceed to step 4.

Step 4
Check the reservoir and add windshield-washer fluid if its level is low or empty. You can fill the reservoir right up to the top-- usually it doesn't have any full or empty indicators. Use a funnel to avoid spills.

Step 5
Check that the water is not frozen in the reservoir. This will only happen in cold weather if you filled the reservoir with plain water instead of windshield-washer fluid.

Step 6
Make sure the small rubber hose that plugs into the windshield washer reservoir is attached.

Step 7
Follow the hose to the rear of the hood. Check for crimped, torn or broken lines. The line from the reservoir splits into two lines at the hood. If damaged, remove the line by pulling at the base where it attaches. Bring it to an auto-parts store and purchase a hose of identical width and length. Install it and check for leaks.

Step 8
Clear any leaves or debris away from the area around the washerfluid nozzles on top of the hood.

Step 9
Clear the washer-fluid nozzle's passage with a needle or a pin.

Step 10
Unhook the washer lines at the reservoir and at the hood, then force compressed air through the lines to dislodge anything stuck in them.
Read more: How to Troubleshoot a Windshield-Washer Pump | eHow.com http://www.ehow.com/how_112946_troubleshoot-windshield-washer.html#ixzz0tunEBlJ9

spark plug changing


remove the 4 bolts and take off the engine cover,
the plugs sit down into the head under the rubber covers on the sparkplug leads.
need a long extension on the plug socket to reach the plugs. removed the old plugs[do them one at atime so you don't mix up the leads]
check to see that the new plugs you have bought are gapped correctly, 1.05mm , they are usually correctly gapped from the pack but is best to check.
Start the new plug into the thread by hand before tightening with the socket handle and tighten to the directions on the pack usually hand tight plus 1/4 turn. this is firm tight not overtightened.
It isn't a bad idea to use a small amount of antiseize compound on the plug threads to stop them seizing in next time you want to remove them.

fuel filter changing


let the fuel pressure off the system and go in under the rear seat to get at the access hatch to get at the pump and filter in the tank.
Have a look on www.kiatechinfo.com it is free to register and you can view an online workshop manual for your car which will show you what is involved with both jobs.

there is no fuel filter it has what they call a strainer in the fuel tank attatched to the fuel pump this is excessable by removing the back seat. there are two clips that slid one way or the other to remove the seat. i found when changing the plugs when installing them i use a 3/8 inch rubber hose the prevent cross threading

left signal quickly


wash battery
wire harness socket connection
the light itself ---right lamp to left
wires have chaffed bare somewhere
removing the lens to see
a mess of vapour control stuff (gas tank associated) in that area. May need to get at it from underneath by pulling the horizontal flap down (held in by a plastic push connector)
a missing ground, a weak ground, or an intermittent ground.
inspect all your light sockets for how well they are grounded to the tub
The bulb sockets receive their grounds through the three tail light enclosure screws that hold it to the tub, make sure they are providing a good ground. In fact, that ground is often screwed up by having mounted those aluminum tail light guards which can cause very hard to diagnose electrical issues.
Mine was doing that and I took the light cover off and tightened the bolts to make a better ground connection and I have had no problems since.
Bingo! It was a grounding issue. I removed the light cover and tightened down the 3 bolts that hold the housing to the body of the Jeep (I bought the tail light protector and they gave me 3 new bolts, and they all had a piece of rubber in between the head of the bolt and the lock washer. I didn't tighten it down enough, so the rubber insulated the ground).
-----------
Follow the wiring harness from the headlight (and parking/turn signal lamp) you will find a "branch" off of the harness going to the body(ground) of the car. There is a "branch" going to ground on BOTH sides (left/right) behind the headlights. If where the wire lug is bolted to the body is corroded (may look good) under the bolt or serrated lug you will have the problems you are describing (dimmer lamp and fast flashing).
When the headlights are turned on they draw more current through the same ground return wire as the turn signal lamps and the corrosion limits the amount of current available to the lamps. This is similar to the use of cheap "jumper cables" in winter....the headlights dim as you crank the engine over due to the small diameter copper wires (or aluminum wires in the real cheap cables).
You can "test" if the ground wire(s) are bad by running a wire from the negative (-) (black) terminal of the battery to the ground wire of the turn signal/parking lamp. If your turn signal lamp gets brighter and the flash speed slows to normal....go looking for that bad ground. Remove the bolt and scrape the area of the body where it was bolted, then smear n (available at Advance & AutoZone) all over the area, wire lug. and bolt. Then re-assemble. You should now have solved your problem.

Spray a little WD-40 on a rag or cloth and run over the wires as you go along to clean debris and oil off the wires and offer some lubrication and protection as well.
Read more: How to Preserve and Protect Electrical Wires Around a Car Engine | eHow.com http://www.ehow.com/how_2283220_preserve-protect-electrical-wires-around.html#ixzz0tcvfSXTB
----------
Disconnect the negative cable from the battery. Loosen the retaining nut on the clamp that is secured to the negative battery terminal. Then, slide the cable off the terminal.
Step 2
Open the hood and locate the turn signal lights. They will be located on the outside of the headlights towards the fender.
Step 3
Remove a section of protective coating on the wiring for both the power and ground wire running to the turn signal. You'll need to use wire strippers for this. Remove a section of wiring that is close to the subframe where you will mount the resistor.
Step 4
Solder a section of 18-gauge wire to each end of the resistor.
Step 5
Solder the other end of each wire you just soldered to the positive and negative wires for the turn signal. Since this is a resistor, polarity does not matter (it doesn't matter which wires on the resistor get soldered to which turn signal wires).
Step 6
Place a liberal amount of heat sink compound on the bottom of the resistor and secure the resistor to a free area on the subframe with safety wire or high-temp electrical tape.
Step 7
Repeat steps three to six for every turn signal light (including the rear lights). You must do all lights for the fast blink LED problem to be solved. Each light must have increased resistance.
---------
Lie down in the floorboard of the driver's side of the car and look up under the dash with a flashlight. You are looking for a small silver plug. This is the flasher. To make sure you have the right flasher, turn on the turn signal and feel the casing of the flasher. You should be able to feel it clicking.
Step 3
Remove the silver plug and replace it with the new flasher. Slide out from the floorboard and start the Galant. Recheck the turn signals and make sure that they flash, as they should.
---------
Start at the battery. Make sure the terminals are clean and that the cables aren't corroded. Follow the negative cable to where it connects to the block and make sure that connection is also clean and tight. You'll also probably have a connection to the fender, and again, clean and tight.
There should also be a ground strap from the rear of the motor to the frame and/or firewall. This is usually on the passenger side with GMs and it very often corrodes and falls apart.
特意找了点资料了解了一下原理:转向灯的闪烁功能是通过频闪振荡电路来实现的,其核心部件是闪光器,正是通过它来控制电流的周期性的通断(闪光频率规定为1.5HZ+_0.5HZ),从而实现闪烁。常见的闪光器有电容式,翼片式,晶体管式3类。这3类闪光器的特性有所不同,故障监控功能也不一样。当一侧转向灯有一只或一只以上转向灯泡烧断或接触不良时,电容式闪光器就使该侧转向灯接通时只亮不闪,以示该转向灯电路异常,以前的国产切诺基就应用了这种电容式闪光器。翼片式和晶体管式闪光器结构简单体积小,闪光频率稳定,适用范围更加广,它的监控作用也更加明显,当转向灯出现故障时,闪光器的振荡频率就会发生改变,闪烁频率会明显加快,正使用这种特殊的方式,提醒驾驶员该侧转向灯电路已经出现故障。现在,大多数的车型采用了晶体管集成电路闪光器,现在还有CAN总线传输技术。如果某个转向灯出现故障,车身控制电脑会让相同位置的其它灯临时代替转向灯的工作,并且发出明确提示,通知驾驶员哪个转向灯已经发生故障,需要及时检修!!!

那是因为有坏的灯泡,或者有短路,或者是继电器坏了

三,可能是你换过转向灯,但换上的转向灯比原来的灯瓦数小些. 解决半法:一,三更换灯泡.二更换闪光器.

4.把转向灯拧下来(方向我给忘了 都试一下吧)
5.用干的摩擦力比较大的东西擦一下灯头(就是后便接触电源那)
6.从新安回原位.

应该不是转向开关的事,你两边都开一下看那边闪的快,如果两边都闪的快那就是说转向继电器坏了,如果一边闪的快就是灯泡坏了,坏那换那就得了!
转向灯接触不好,拆下来重装一下,或是把接触弹片较一下就行了。
如两边都快,请检查转向开关,及闪光继电器。

coolant changing


one case for tool
one case for dirt item
work suit
big botton for water
big botton for waste water
13 gal rubblish bag
one basin
soft water
flat ground
4. inspect hose 0. resovior
2. drain plug 1. radiator cap  3. close drain plug
add flush; add water; close caps run engine, heat on high -> normal temprature
close and drain; add water; run engine 15 m
wait it cool; drain; add new coolant
close cap; run engine with radiator loosen, heat on high -> normal temprature
check level; check leaks and clean


run case, botton密封,

emission check。
safety check。
通不过咋样? 不撕票。 目测先。 台车之前。 刹车灯。

engine oil changing


1. oil pan drain plug located: Back side of oil pan towards the crankshaft pulley end.
2. oil filter located? Opposite side from the plug near the crankshaft pulley.
check list: plug size 5/8 best, 16 ok; oil 5-20w better, or 5-30, oil filter wrench;
paper, napkin, glove; 2 basons, seal bag, plastic bag, adhesive tape; light, curtain cloth; funnel; bucket, dustbin;
-------
0. dress cloas so that arm can release and go out
0.5 bag paste to bason
1. drive to heat the car, stop in a plain, dark place.
2. Close car and lift Handbrake.
3. take: cloth, 5/8 wrench, bar, bason, light, glove, paper
4. dress glove -> put cloth -> lie down so that head in the middle -> 5/8 wrench to plug -> strike wrench with bar quickly
-> put bason under and release plug with hand -> take the plug carefully, watch the seal, don't put it in the bason -> wipe with papers
-> put plug in a safe place and remember it.
5. open the cap of the car and open the oil cap, 测油棒提起。
6. take all things back accept cloth.
7. have a rest for have an hour.
8. take: 5/8 wrench, oil filter wrench; light, glove, paper
9. learn how to use oil filter wrench;
10. locate oil filter -> use wrench to let it move -> move bason under -> move filter and put it into bason
11. unware glove and use hand
12. 新油润一下密封胶圈以利密封。don't put too much oil to filter, otherwise, as oil spill out, it will be too slipy to rotate.
13. locate the nut -> keep trying to rotate -> fix it.
14. rotate oil plug, don't put basin on the right of hand, because the hand with big strengthen may strike it.
15. see how much oil in bason and judge how much oil to use.
16. lift the funnel a little will speed up -> drop in about 3.5 Qt -> see the oil level in stick, -> add more or not.
17. put a plastic bag into bucket -> use adhesive tape to seal oil and put it in the bucket.


The first number (such as 5W) indicates the low-temperature (Winter) viscosity.  Viscosity simply is a measure of an oil’s ability to flow and protect at certain temperatures.  The lower the number, the easier the oil will flow (and protect) in cold weather when starting your car.  The second number (such as 30, in 5W-30), indicates the thickness of the oil at operating (high) temperatures.

1. 开车先兜两圈,让温度表上升到工作温度,停车入位,息火,开始铺棉垫子或报纸于
前轮前,搞清楚泄油螺栓的具体位置,于同侧支起双千斤顶 (绝非杞人忧天,因为天的确
会塌下来) ,不用支的太高。收集器推车底下去备用。
2. 掀开动力仓盖,把引擎顶部的写有ENGINE OIL 字样的齿轮形盖子拧下来,通气的干
活。然后躺车底下去,用死外六方扳手或梅花扳手 (12-POINTS) 拧下泄油栓,有时要用
吃奶的劲儿。我换的时候我没买死外六方,梅花的又不够大,棘轮扳手加3/4套筒我认为
难以承受这么大的扭力,而且力臂也不够,我就用的200毫米的活扳子,那叫一个费劲,
结果两败俱伤,六角磨损了,扳手的边缘居然成犬牙状--弄出NICK来了。所以我怀疑哪个
泄油拴是高碳钢的。长此以往,次数不用多,4-5回我估计六角就磨圆了 (ROUND OFF) ,
您要是学我,嘿,到时候银子就又能找到归宿了。所以啊,今天我去买了一个大十字的四
头死外六方扳手,我戏称其为飞去来扳手。这东东在卸轮子时也用的上。啊,净顾跟您说
话了,油都滴滴达达往下淌了,小心烫手,一把把收集器拽过来接着,BY THE WAY,您开
始工作的时候没忘带手套吧,即便是男同志也要对得起自己的手啊。
3. 这油一开始是滴达,整个螺栓下来后就沽沽的了,看着废流出来心情激动,当年大庆
第一口井出油时工人们的心情略微有所体会。根据油的颜色性状您可以揣测此次换油时机
和引擎内部情况。有的车放出的油还挺清,有的就跟石油没两样。估摸着有十多分钟吧,
放差不多了,把泄油螺栓拧死,哪个密封胶垫您可别忘了给装上,要是发现破损了就换他
一个。
4. 啊,终于可以从不见天日的车底下钻出来了,前提是你的机油滤器在引擎正面,LOCA
TE机油滤器,周围用破布妈一下,把特制扳手套脑瓜顶上,用3/8棘轮扳手给丫拧下来,
必要是用加长臂,运作空间应该没问题,起码TOYOTA这点作的就很好。注意滤器里的残油
,防烫为主。滤器放到回收器上DRAIN干净。
5. 拿出新滤器,用新油润一下密封胶圈以利密封。确信旧胶圈没有沾在底座上,将新滤
器用手拧紧,在用棘轮扳手额外拧3/4圈。 (又有1/2圈说,看你如何定义HAND-TIGHT了)
6. 然后就是激动人心的REFILL了,提起新油从顶上的机油盖古达古达灌进去,灌多少主
观看手册客观看油尺,我的佳美是4升,别的车只要不是坦克装甲车辆差不多也3,4,5升
左右吧。反正跟排量有正相关。(我给同学的TERCEL换就少用了将近一升) 。
7. 灌入标量后稍歇片刻,喘口气儿,让后抽油尺,油平在L到F之间偏F就行了,不行再
加,然后拧紧机油盖,HAND-TIGHT。关HOOD,发动,跑两圈回来,息火,少倾,拔油尺,
擦干净,插入,拔之DOUBLE CHECK。没问题后,查滤器处,泄油拴处有无漏油。 (注意此
刻少许的滴达很可能是灌油时不小心SPILL的)。
8. 翌日,再查一下这两处,及停车位的地面,地上有油的话要确定确实是你自己的油。
别笑,有这样的先例啊。
9. 废油DISCARD掉。