flashing means serious problem
loose gas cap, get a dealer/oem gas cap
"trouble code"
engine oil
misfiring
o2 sensor (may on the exhaust manifold
along with a door chime that no longer worked. Turns out to be the Body Control Module (BCM) Doesn't affect emissions or safety
Sunday, June 24, 2012
Saturday, June 23, 2012
mileage drop
air filter, o2 sensor, Catylitic convertor, fuel tank cap.
Engine:
- Retiring PCV system.
- Air induction (Air filter, throttle body, secondary air pump if so equipped).
- Vacuum hose(s) disconnected. vacuum leak
- Faulty thermostat not allowing the engine temp to stay at optimum.
- Blocked exhaust making the engine work harder to counter back-pressure.
- Induction/forced air plumbing leak for the turbocharging if so equipped.
*These may not be present, as your engine seems to be running smooth.
Tranny:
- Check the fluid colour/contamination/level.
- Check that the mode selector is in Economy and not in Sport.
Wheels:
- Check low tyre pressure.
- Check for uneven tread wear/have 4-wheel alignment checked at a reputable shop.
Other:
- A/C beingselected at Defrost, keeping the compressor on at all times.
换完spark plugs,顺便把throttle body也拆了下来,用cleaner清洗了一下,一开始
我不想拆这玩意,但是事实证明这东西非常好拆,特别是在你拆了intake后,用allen
wrench卸掉4个bolts就下来了。发现内壁上一层嘿嘿的污垢,管进气的叶片因为这些污
垢都不是很滑畅。 后来一想都到这步了,顺便把MAF sensor也清洗了一遍,这个就是
小儿科了,不赘述。。
清理intake manifold(EGR)是肯定可以提升MPG的 因为能有效率的将废气回锅,废气也还是能利用的。所以MPG肯定上去
我不想拆这玩意,但是事实证明这东西非常好拆,特别是在你拆了intake后,用allen
wrench卸掉4个bolts就下来了。发现内壁上一层嘿嘿的污垢,管进气的叶片因为这些污
垢都不是很滑畅。 后来一想都到这步了,顺便把MAF sensor也清洗了一遍,这个就是
小儿科了,不赘述。。
清理intake manifold(EGR)是肯定可以提升MPG的 因为能有效率的将废气回锅,废气也还是能利用的。所以MPG肯定上去
Wednesday, May 9, 2012
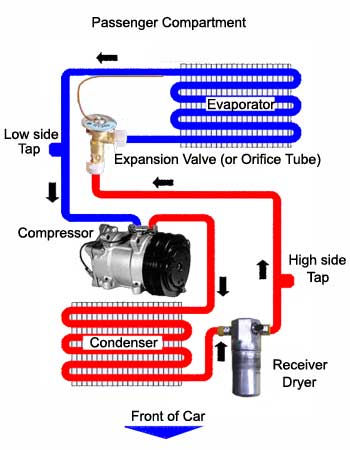
ac system air conditioning
knowledge
simply reducing the pressure of the liquid
refrigerant will cause the temperature to be reduced. The expansion valve (or orifice tube) does just that.
diagnosis
空调完全不制冷, 可能为Compressor或Compressor上的clutch损坏. 需更换compressor or clutch制冷不畅.
可能为空调漏氟,需更换全部的橡胶密封圈(O RING), expansion device,the fitments for the
oil cooler and transmission cooler for the radiator. ACCUMULATOR (DRYER) 和O TUBE (我的车车的O TUBE必须连着高压管一起换)
if your evaporator inlet and outlet feel
the same temperature to your touch, and you still have a “no cooling”
condition, then you have another problem in the controls, temperature blend
door or air distribution. But you know your A/C refrigerant circuit is working
perfectly. Remember that in order to check a superheat condition in the
evaporator, you are checking the DIFFERENCE between the temperature at the
inlet and outlet. Be sure that you locate the orifice tube (where the dimples
on the tube are) and you check the temperature AFTER that point.
by looking at the inlet side of the orifice
tube screen. If a substantial amount of debris is found, flushing would be
recommended.
buy
Compressor;
-----tool-----
1.
专业级空调真空/压力表 (对解决疑难问题非常有用)
2.
wiggle socket
3. A/C and fuel line separator
4. 绿色垫圈
2. 旧真空泵Vacuum Pump ($30)
(注:专用空调真空泵需$300.) 去修车铺抽真空,耗费$20.
air compressor, how many gallons?
PAG oil (100 viscosity) . Ester 润滑油,$7.
O-ring, 买了两次才够, 每次$4.99. 第一次买的缺少某些size.
第二次买的正好补上缺的. Nylog, 准备装O-ring的时候滴一滴来防漏的, 结果没买到. 就算了
Pulley?
Snap-On swivel socket
Air
Conditioning System Flush Kit
spanner wrench
-----step-----
空调里面怕水汽. 找个干燥的晴天做吧. 或者做完了用干燥空气或氮气再清一道.
抽真空
看看各个接头的地方, 有没有油出来后灰尘沾染后结的黑垢也就差不多了.
Receiver driers are almost always on the
HIGH pressure side, usually in the liquid line that runs between the condenser
and evaporator.
there are two sizes of AC fittings on the
car. A big one (HP side) located up by the rad and a small one (LP side) down
below the PS tank.
remove the radiator fan
Compressor is much easier to get to after
you pull the dryer.
Getting the lines off the dryer is very
diffucult and requires en expensive release tools.
it would have been a whole lot easier to
take it out from the top. Because of the 'locking' holes at the radiator and
the PS pump hoses and all. The radiator itself, however, is easier to take out
from the bottom.
I added an
ounce or so of PAG oil (100 viscosity) to the suction port of the replacement
compresso
The rear bolts are a cinch after
disconnecting the lines, the front bolts are a bit of a challenge to get to.
The upper one requires a socket/ratchet combination of just the right width,
given the proximity of the framerail and other pulleys. The lower one can be
accessed through the wheel well with a Snap-On swivel socket and an extension.
Once all four bolts are out, the compressor can be removed from the top.
灌入清洗油,然后用高压空气将油从另一端打出,
用漏斗将少量A/C flush oil由condenser的入口倒入, 等待3分钟后, 用汽车胎打气机的压缩气出口接在condensor的入口上打气,你将看到一股股的黑色脏油喷出. 然后再灌入少量A/C flush oil,再打出,直到喷出的油干净为止. 继续打气,直到没有油喷出为止.
其他如high press pipe, low press pipe and evaporator的清洗与以上相同. 清洗完毕,还需要更换ORIFICE
TUBE, $5但对于有些汽车的O TUBE 与High Press Line是一体化的,就只能更换新的high press line了.$30.
安装时,建议把每个部件与其他部件相连处的绿色垫圈全部更换,以防止日后漏氟. 垫圈在AUTOZONE可以买到, $5 一大包.
You can pour refrigerant oil into the
suction port and turn the compressor hub by hand which will pump clean oil
through the compressor. Remember, compressors don't compress liquids. So, make
sure you rotate the compressor hub by hand enough to ensure you don't liquid
"slug" the compressor. hoses with mufflers should be replaced instead
of flushed.
Flush evaperator和联接的管道, 3是condensor和连接的管道. 加入清洗油, 然后用propane从一边管道冲, 另一边管道就冲出气态propane和油. 用塑料桶接着. 冲洗几遍后, 加Ester润滑油再冲两遍. 压缩机的清洗, 是倒出旧油, 然后加入清洗油, 上下左右颠倒, 再旋转,然后倒出. 如此几遍, 换成Ester再来几遍. 我想是否不买清洗油, 直接用Ester大概也可以. 不过Ester比清洗油粘稠.
3. 拆开所有的接头, 换上新的O-ring. 有一个结果我拧不开, 就没换. 还有一个接
头, 邻居说, 既然没漏, 为何要换. 结果就没换.
4. 都拧紧, 换上买来的要换的receiver
dryer和新的一段管道, 就这样了.
5. (还没做) 检漏. 需要给系统加上压力, 然后看是否漏. 还没想好怎么做. 我准备
直接加一灌R134进去然后看漏不漏. 有条件的加氮气. 没条件的加压缩空气. 我
更没条件. 连气压计都没有.
6. (还没做) 再次抽真空.
7. (还没做) 加润滑油和R134.
Changing an Evaporator Core - in Pictures Link to
http://www.kodakgallery.com/ShareLanding.action?c=10f8s0wj.8zl8j8h7&x=0&y=o2vyri&localeid=en_US
pull a vacuum to make sure the system is
still sealed
I use 4 ounces (120 ml) if I find oil I can
pour out of old accumulator. If the evaporator lost enough oil out of system so
the accumulator is dry then add 6 ounces (190 ml).
SInce you are working on it during cold
weather you need to run engine for 20 minutes and have heater turned on full
inside car as you pull vacuum on system. The moisture in system will not be
removed when the temp of system components is below 25C. The water will not
evaporate during the evacuation below that temp but warming the components
allows it to happen. Leaving moisture in system will kill the new evaporator in
2-3 years due to internal acid corrosion.
(civic)
for condenser replacement add 50ml(1 2/3oz)
for receiver/dryer add 10ml(1/3oz)
(Mustang)A full oil charge is 7 ounces for
that system. I normally run 8 ounces, as Ford tends to underlubricate. The
accumulator is huge on these systems, and the extra ounce is just insurance,
really. I put 4 in the compressor and 4 in the accumulator. The green dye is
the oil in that system. The new PAG oil you get won't have that in it, so for
leak detection purposes, it may be a good idea to add some u/v dye in with the
new PAG oil. I will assume the old comp failed, since the comp, accum, and
liquid line are the correct parts to be replacing for a comp failure. Just be
darn sure to flush the evap, cond, and manifold lines to get rid of any
contaminants left from the old comp, and evacuate the system for 30 min to pull
any moisture out before charging. This way you know you have a clean, dry
system, and are also sure how much oil to add. Which would be a full charge, in
this case.


check maintenance
1. set of socket wrench/socket, set of craftman or other name brand.
2. automotive diagnositic multimeter
jack stands or ramps, floor jack, deep sockets, mallet 材料好,不容易变形;尺寸准确.
一套1/2 drive socket + breaker bar 比较bulky,可以拧东比较紧的螺丝。
一套3/8和1/4 drive的socket,对付车上的小螺丝。
Weekly checks
1. Engine oil check (DIY)
2. Coolant level check (DIY)
3. Brake and Clutch fluid level check (DIY)
4. Screen Washer level check (DIY)
5. Power steering fluid level check (DIY)
6. Wiper blades check (DIY)
7. Tyre condition and pressure check (DIY)
8. Bulbs and fuses check (DIY)
Every 3000-5000miles or 3-5months
1. Renew the engine oil and filter (DIY)
Every 10,000miles
1. Check the brake pad thickness (DIY)
2. Renew the pollen filter elment (DIY)
Every 12 months
1. Check the operation of all lights and horn (DIY)
2. Check the automatic fluid level (DIY)
3. Check all the underbonnet components and hoses leakage (DIY)
4. Lubricate all hinges, locks and door check straps (DIY)
5. Check the condition of driveshaft gaiters
6. Check the braking system for leakage and damage (DIY)
7. Check the conditon of exhaust system and its mountings (DIY)
Every 20,000 miles
1. Check the condition of driving belts, renew if necessay (DIY)
2. Renew the spark plugs (DIY)
3. Renew the Air filter (DIY)
4. Check the manual transmission oil level (DIY)
5. Check the transmission leak or damage (DIY)
Every 40,000 miles
1. Renew the automatic trans fluid and filter
2. Renew the fuel filter (DIY)
Every 2 years
1. Renew the coolant (DIY)
2. Renew the brake fluid (DIY)
------
tools
general: 剪子,钳子,锤子(铁的和胶的),扳手,起子,刀子,...手套,安全goggle,面具:)
1. 支车:
. 1 floor jack (preferable 20" above) 或者 车带jack(麻烦且工作受限)
. 2 jack stands (preferable 2.5 ton above)
. 2 wheel chokes (or bricks if you can find some good ones:P)
2. 装卸轮子:
. 支车 或者 车带jack
. 1/2 socket set w/ breaker bar
. 1/2 torque wrench
. preferable an impact wrench
. Tire pressure gauge and pump if dealing with tire pressure:)
3. 换油: (写在or前面的是preferable的)
. 支车工具
. 1/2 or 3/8 torque wrench
. 1/2 or 3/8 socket set w/ breaker bar
. preferable a filter wrench (adjustable的那种爪式wrench一般只用来卸)
. 3/8 socket set if you want to use cap-style filter wrench
. A pan to hold old oil:)
. A 漏斗 to add new oil:)
4. 换闸:
. 支车 和 装卸轮子 工具
. C Clamp(类似钳工夹固刚件的东西,不过是超简易缩小版本:P)
. High Temperature Grease
. flat screw driver (optional)
. 2 screws (两个M8的螺丝?) to force drum out if drum brake gets stuck
. a 3/8 torque wrench (optional, 可以用1/2的大家伙将就)
. Brake cleaner (optional, to clean the brake powder ash safely)
5. spark plug: (写在or前面的是preferable的)
. 3/8 or 1/2 torque wrench
. 3/8 socket set w/ long extension bar
. actually it's the 3/8 spark plug socket
. a long nose, slim 钳子 (optional but helpful)
. clearence gauge (optional)
. anti-sieze (optional, may use frsh eng. oil on plug threads instead)
. a rubber tube that fit on the plug' china stick (optional)
6. electrical (电池,发电机,starter,Keyless/Alarm...):
. 1 multimeter w/ DCA DCV OM(w/ conductivity), preferable digital
. some extension or replacing gauge electr. wires
. knife and 剪刀
. electr. soldering iron/gun w/ solder
. electr. tape and optional mounting/organizer kits
. other misc.
7. Body Painting:
. Touch-up w/ clear coat
. fine grain sand paper (newer car 1500-2000 grain, trash car 1000 ok)
. polishing compound & Wax
. 100% cotton towel
. Sanding machine if you have a heavy duty trash car w/ large damage:)
. other misc.
8. 其他各种油和液体:
. some wrench:)
. if brake fluid, need 支车 和 装卸轮胎, and a 助手 或者 真空泵
. if tranny fluid, need 支车 at least
. matching fluid
. various kinds of 漏斗 + 连接管子
. A pan
. other misc.
9. 发动机部分,传动/轮轴部分:
. 支车 卸轮 的都备好吧
. 大号的torque wrench may be needed (e.g. 250 ft*lb +)
. some chalk or white paint to mark original positions:)
. heavy duty pry bar
. jumbo socket may be needed:)
. preferable a pwrful impact wrench
. n-jaw puller, if needed
. all kinds of wrenches, socket, extensions
. other misc
10. 油路部分:
. various kinds of socket and wrench, including crawfoot wrench
. safety shop towel:)
. vacuum pump w/ gauge & fuel pressure gauge may needed if debugging:)
. 支车 卸轮 if needed
. other misc.
11. Mounting, Broken bolts rescue:
. Electr. Drill
. WD-40 or other liquid wrench or rust eater
. screw extractor, tap & die set (主要需要公的攻丝锥:P), if needed
. other misc.
13. Muffler:
. powerful rust eater and/or liquid wrench
. Various wrench and socket (important:P)
. lubricant liquid like WD-40
. 撬,钳,割,锯等各种下三滥工具
. 当然要支车 (and 卸轮)
jack car
jack stands on the frame under driver side. -- the rail bend as I lower the jack
put floor jack to jack up the point just adjacent to the standard jack stand point and put jack stand in very solid.
: if want to use scissor jack, first look for additional jacking point in the middle of outside frame between the front and rear one.
: mine has it. So I jacked up there and put jack stand to the front or rear.
Put jack stand under the frame, anywhere.
radius arm; pinch weld; front axle; control arm, right on the cut out; pinch rail, sub frame; inner fram center jack point not trusted.
You will see at the screw jack, there is a slot. You must fit the slot under the jackpoint like the picture below.
再frame的靠近轮子的部分,用小槽或者其它方法标注。多半是owner's manual里面介绍的更换备用胎的时候支撑的地方。里面一点的rail上,就是地盘下面的两条明显的
钢梁。如果jack stand放在frame的支撑点上,一定要把那个点放在在jack stand的中心上,避免可能的侧偏,甚至把frame的支撑弄折。放在rail上,也是一样的道理。
只是rail比较宽,应该可以更容易判断中心。如果需要把frame上的支撑点给jack stand用的话,在什么地方可以放这个scissor jack呢?这个时候需要考虑购买floor jack了,floor jack的支撑点,多半在车的中心线上,前后各一个。具体位置,只能去service manual,或者repair manual上面找了。俺的小破车,前后都是一个铁钩子,还见过有的车是一块白色的塑料块,在底盘的中间位置,或者直接是中间的加固钢梁上面。也有人介绍说,可以用floor jack去支撑suspension上面的一些地方,但是俺具体没有用过。如果运气好,scissor jack也是可以撑这个floor jack的地方。俺的是不行了,因为是个钩子,平的地方应该就可以。但是需要深进去老远,另外,把jack stand放在里面的rail上面的方法也不用买floor jack。它和scissorjack匹配的很好,直接在frame上撑起来,然后把jack stand调整好高度,放进去即可。
沥青的也已接受,但一定要注意当时的温度,路面是否可以承受重力。俺今天就发现,家门口的一块地面非常的松软。尽量避免有斜坡的地方,选择放开刹车,车不会自己滑动的位置。当撑前面的时候,需要把后面的两个轮子block住,同时把手刹拉紧。撑后面的时候,就一定要上档。手动车用1st,自动车用P,而且需要block前轮。
过程中,一定要注意,jack是否在最佳的位置,是否偏离了中心,避免滑落。为了保持最佳的稳定,通常把jack stand放在最低点,而且两面的高度一定要保持一致. 放一点,看一下,因为车会随着放的过程有前后,甚至微小的左右移动,可能在车身接触jack stand之前,已经让jack stand错过了对应的那个支撑点了。如果发现放歪
了,不要着急,重新把jack升起来(控制hydralic floor jack的升降,还是需要一定的练习。可以不加负荷,多练两次,甚至不放jack stand,只是把车抬起放下几次,直到可以准确控制高度,熟练为止)完全把车放在了jack stand上以后,撤掉jack,需要最后确认一边车的平稳。前后左右轻轻的用力推动,看看是否有晃动,地面是否可靠。
0. 绝对避免在车流量比较大的地方撑车。一旦发生碰撞,根本没有办法控制,同时找到伙伴在周围。
1. 绝对不要在松软、不水平的地上撑车。
2. 绝对不要在没有block轮子的时候撑车。
4. 绝对不要再车地下用过多左右或者前后的力量,避免车从jack stand上翻下。可以用一定上下方向的力。
windshield wiper
The problem may be something simple like a disconnected hose, or dirt in the spray nozzle.
Difficulty: Moderate
Instructions
Things You'll Need:
Windshield-washer Fluid
Replacement Hose
Compressed Air And Air Nozzle
Funnel
Needle Or Pin
Step 1
Turn on the windshield washer with the engine off and the key in the On position.
Step 2
Listen for a humming sound to determine whether the windshield washer motor is operative. Open the hood and ask a friend to listen while you turn on the windshield washer. If you don't hear any sound, check the fuses.
Step 3
Replace the fuse if it is blown (see How to Fix a Faulty Car Fuse). If the fuse is not blown and the motor is silent, have your mechanic replace the windshield-washer motor. If you hear the motor humming, proceed to step 4.
Step 4
Check the reservoir and add windshield-washer fluid if its level is low or empty. You can fill the reservoir right up to the top-- usually it doesn't have any full or empty indicators. Use a funnel to avoid spills.
Step 5
Check that the water is not frozen in the reservoir. This will only happen in cold weather if you filled the reservoir with plain water instead of windshield-washer fluid.
Step 6
Make sure the small rubber hose that plugs into the windshield washer reservoir is attached.
Step 7
Follow the hose to the rear of the hood. Check for crimped, torn or broken lines. The line from the reservoir splits into two lines at the hood. If damaged, remove the line by pulling at the base where it attaches. Bring it to an auto-parts store and purchase a hose of identical width and length. Install it and check for leaks.
Step 8
Clear any leaves or debris away from the area around the washerfluid nozzles on top of the hood.
Step 9
Clear the washer-fluid nozzle's passage with a needle or a pin.
Step 10
Unhook the washer lines at the reservoir and at the hood, then force compressed air through the lines to dislodge anything stuck in them.
Read more: How to Troubleshoot a Windshield-Washer Pump | eHow.com http://www.ehow.com/how_112946_troubleshoot-windshield-washer.html#ixzz0tunEBlJ9
Subscribe to:
Comments (Atom)